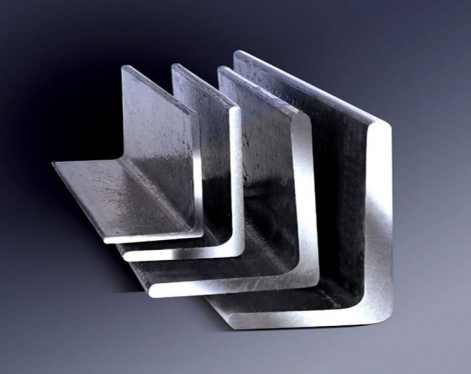
The process of polishing 316 stainless steel angles to a mirror-like sheen is a meticulous technical task that enhances the aesthetic appeal and inherent resistance to corrosion and wear of this material. Bright polished stainless steel angles, prized for their reflective surface and exceptional strength, are extensively used across various industries for applications demanding high standards of cleanliness and endurance.
Below are the detailed steps to achieve a high-quality finish on bright polished stainless steel angles, a process that typically involves two main stages: grinding and brightening.
Brightening is the final stage of polishing, where the surface of the bright polished stainless steel angles is imparted with a mirror-like brightness and luster. This stage involves meticulous visual inspection and the application of specialized techniques like mirror finishing and buffing.
Before polishing, apply wax to the wool wheel and then proceed with polishing. Control the electric motor's speed and power to ensure the desired polishing effect.
Through the meticulous polishing process described, the surface of stainless steel angles achieves a highly smooth and reflective finish, enhancing both appearance and practicality. The skill and precision evident in China's polished stainless steel angle factories, such as Nansteel Manufacturing Co., Ltd, play a crucial role in delivering these exceptional results. Attention to force control, consistent polishing direction and angle, and post-polishing cleaning and maintenance are essential to ensure the optimal polishing outcome.
Below are the detailed steps to achieve a high-quality finish on bright polished stainless steel angles, a process that typically involves two main stages: grinding and brightening.
1.Grinding
The grinding process is fundamental to the polishing of 316 stainless steel angles and includes several critical steps:(1)Visutial Inspecon
Initially, inspect the welded parts for any defects such as missed welding, burn-through, uneven weld points, deviation, depression, misalignment, severe deformation, or scratches. If such defects are present, they must be corrected in the preceding process.(2)Coarse Grinding
Utilize a 600# sand belt to perform back-and-forth grinding on the three sides of the workpiece to remove weld points and bruises, forming a preliminary rounded corner at the weld and achieving a surface roughness of R0.8mm. Attention should be paid to controlling the tilt angle and pressure of the sanding machine.(3)Semi-Fine Grinding
With an 800# sand belt, further refine the grinding process, primarily to correct seams and marks left from coarse grinding, ensuring the surface is free of scratches and begins to brighten, reaching a surface roughness of R0.4mm.(4)Fine Grinding
Apply a 1000# sand belt to correct fine lines, aiming to make the seam between the ground and unground parts of the workpiece nearly disappear, further brightening the surface and approaching a mirror-like effect, with a surface roughness of R0.1mm.(5)Sand Belt Replacement
Replace the sand belt as needed based on the welding condition and polishing requirements of the workpiece, ensuring steady rotation on the sponge wheel.(6)Grinding of Three Sides
The welded parts must be ground along the horizontal and vertical sides, demarcated by the welding edge, ensuring all three sides are properly treated.(7)Polishing Machine Schematic
Nine polishing machines are divided into three groups, each responsible for grinding one side, with the latter group's grinding position 1-1.5mm ahead of the former to remove the marks left by the previous group.(8)Adjustment Mechanism
Each sanding machine is equipped with an adjustment mechanism for front and back, up and down, and angle adjustments to accommodate the welding conditions of different workpieces.(9)Waxing and Buffing
These are key processes in the brightening stage, using high-speed electric motors to drive wool wheels and cloth wheels, in conjunction with polishing wax, to achieve a mirror-like polish.
2.Brightening Part
Brightening is the final stage of polishing, where the surface of the bright polished stainless steel angles is imparted with a mirror-like brightness and luster. This stage involves meticulous visual inspection and the application of specialized techniques like mirror finishing and buffing.
(1)Visual Inspection
Examine the welded parts entering this stage to confirm there is no missed grinding, incomplete removal of weld points, or other issues that cannot be rectified in this stage. If such issues are present, they require re-machining.(2)Mirror Finish
Drive a wool wheel with a high-speed electric motor, combined with polishing wax, for mirror polishing, being careful not to damage the protective film on the workpiece's surface.(3)Buffing
Use a cloth wheel spinning at high speed to wipe the workpiece's surface, removing dirt and polishing wax, and restoring the surface to a pristine brightness.
(4)Waxing Instructions
Before polishing, apply wax to the wool wheel and then proceed with polishing. Control the electric motor's speed and power to ensure the desired polishing effect.
(5)Buffing Supplement
During buffing, keep the cloth wheel clean and replace it as needed, using grinding powder to remove polishing wax and ensure the brightness meets mirror standards.Through the meticulous polishing process described, the surface of stainless steel angles achieves a highly smooth and reflective finish, enhancing both appearance and practicality. The skill and precision evident in China's polished stainless steel angle factories, such as Nansteel Manufacturing Co., Ltd, play a crucial role in delivering these exceptional results. Attention to force control, consistent polishing direction and angle, and post-polishing cleaning and maintenance are essential to ensure the optimal polishing outcome.


